
What Are Wig Knots?
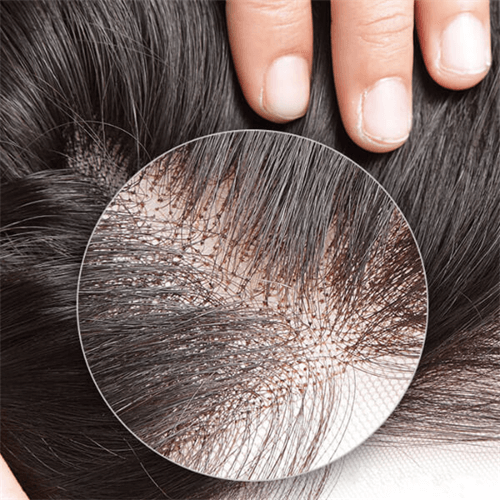
Before we start to bleach the knots, we need to understand what they are. If you look at the wig’s lace cap, you’ll notice that there’re some knots coming from where the hair strands are tied to it. These are what we call the wig knots.
They play an integral role in ensuring that the hair strands don't fall off from the lace. Suppose you were unaware, there're two main types of knots; double knots and single knots.
What Are Single Knots?
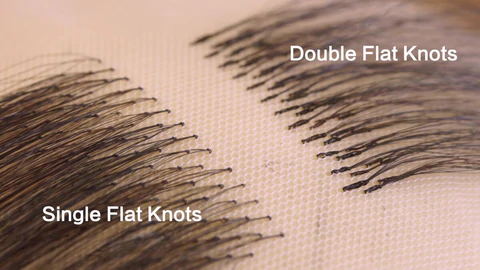
Single knots are different from double knots in that they’re only made from a single hair strand. They’re great when you need something barely noticeable, which is the main reason some women choose wigs with single knots.
Single knots, when worn, can give your hair a natural look. The other benefit of single knots is that they're easier to bleach compared to double knots. However, the issue with them is that they tend to shed easily.
What Are Double Knots?
Unlike single knots, double knots have two or even more strands of hair. Aside from being more noticeable than single knots, they're also harder to bleach. Since double knots are stronger and firmer than single knots, you'll notice negligible hair sheds from them.
Most of the time, you’ll notice that most wigs have single knots around the hairline, while the rest of the lace has double knots. They do this to avoid too much shedding.
Bleached Knot Wigs: Before And After
It's possible to either bleach or leaves your wigs unbleached. Either way, it's imperative to know what you'll get afterward. There's a huge difference between a bleached and an unbleached knot.
Right from the package, a wig with bleached knots will tend to look more natural. These bleached knots will resemble the color of your skin. Thus, if you put on the wig on your head, it’ll look like the hair is coming right from your scalp. Now, you understand why many people choose to bleach their wig knots.
Nevertheless, you should understand that bleaching the knots might make them weaker. Suppose your knots get weak, the chances are that they’ll shed easily. You need to know this fact before starting to bleach the knots.
Unbleached knots, though don't look natural, are stronger and less prone to shedding. They have some black dots that will only make your hair look unnatural. It doesn't sound right, but it's okay if that's how you like your wig.

Steps Involved In Bleaching Knots On A Wig
Since you have all the tools and products you need, you’re ready to get to the most exciting step. Now you should commence bleaching the knots on your wig and make the hair more natural. Now, let’s get started, shall we?
1st Step: Prepare The Wig
Before doing anything, you need to prepare your wig and get it ready for the main process. Here are the steps you need to follow so that your wig is ready for the bleaching process.
Place the wig on a table or counter. Ensure the lace is facing down and then dampen the wig by spraying some water on it. From there, try to brush the flyaway and baby hair toward the back to avoid getting bleach on them. Use your alligator clips to hold and keep the hair out of the way, lastly, turn the wig upside down and then place it on a foil.
2nd Step: Ready Your Bleaching Mixture
After you’re done getting the wig ready for bleaching, now you need to prepare the bleaching mixture. This will only take a few minutes, so let’s get started.
Since you’ll be using some chemicals that might irritate your skin, put on some gloves. Remove the bleach mixture from the package and remove the measuring cup it comes with.
Dispense some mixing powder into your mixing bowl. Once you've added the developer into the mixing bowl, note that amount added will depend on the amount of bleach powder you added in the initial step.
Thoroughly stir the mixture using a plastic spoon or tinting brush. Keep going until the mixture is smooth and doesn’t contain any clumps.
Using a spoon, scoop up some of the mixtures and carefully observe them. It needs to be thick, just like a cake frosting. This is to ensure that it doesn’t slip through the lace when applied to the knots.
Add one more spoon of bleaching powder if you notice that the mixture looks runny. On the other hand, if it looks dry, add one more spoon of developer.
3rd Step: Apply The Knots
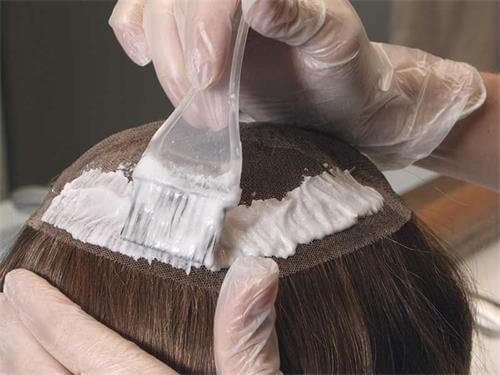
Do not press the bleach hard into the lace. This would definitely damage the hair. You should follow the right steps to apply the bleach to the knots.
Pick a tinting brush and apply the bleach to the lace gently. This is to ensure that the bleach doesn’t go through the lace. Since you shouldn’t miss any knots, you should ensure that the entire lace is covered.
After applying the whole lace, cover the area with an aluminum foil and do it gently so that the bleach doesn't go through the lace.
Let it stay there, but keep checking the knots after every ten minutes to ascertain that the bleach is working. In many cases, the knots should be bleached within 15 to 30 minutes.
4th Step: Rinse, Wash, and Care
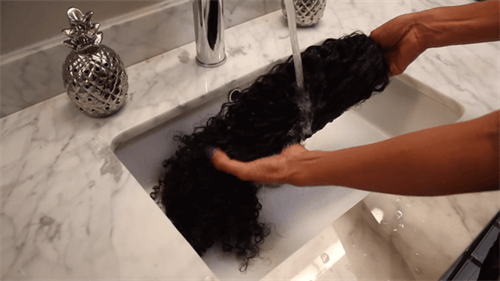
After confirming that there are no black dots on the wig, now is the time to rinse, wash and care. Remember, there're important steps you should follow when doing these things to avoid damaging the wig.
Thoroughly rinse the wig to get rid of all the bleach. Hold the lace upward and tilt so that all the bleach falls into the sink. By doing this, you'll prevent any bleach from finding its way into the hair. In some cases, you might have to keep rinsing for some minutes to remove all the bleach.
After rinsing the wig, use a neutralizing shampoo to stop the bleach from further processing. Even if you rinsed the wig, some bleach could still be working and might damage the wig.
Both the hair and the lace should be covered in shampoo. Apply more neutralizing shampoo and let it stay there for a few more minutes before rinsing again.
From there, you want to apply purple shampoo to the wig and then lather it up. You should do this to get rid of brassiness from the wig.
It’s vital to take good care of your wig after bleaching the knots. The chemicals can damage the wig by making it too dry or brittle, so you should use the right products to take care of it. For instance, you might want to apply a moisturizing conditioner to the knots to keep them safe from possible damage.
5th Step: Dry the Wig
There’re many options to go by when it comes to drying your wig. If it’s a straight wig, consider using a soft towel to dry it before proceeding with your unique styling process. For curly wigs, you should use a moisturizing cream and then let it dry for a few minutes.
 8 Disney Princesses Hairstyle Collection-You Don't Miss
 Swoop Ponytail: How do You Tie a Unique Hairstyles?
 2023 Hottest Trend: Curly Bob Haircuts
 U Part VS V Part Wigs, Which One Is Better?

